
FAQs
Before cooking with your smoker, the following steps should be closely followed to both cure the finish and season the interior steel. Failure to properly follow these steps may damage the finish and/or impart metallic flavors to your first foods.
- Brush all interior surfaces, including grills and grates, with vegetable cooking oil.
- Build a small fire on the fire grate or pan with charcoal, being sure not to lay coals against the walls.
- Close door. Position damper and smokestack damper approximately to one quarter open. This burn should be sustained for at least two hours (the longer the better). Then, begin increasing temperature by opening the damper and smokestack damper halfway and adding more charcoal.
Your smoker is now ready for use.
Cleaning your grates will help reduce any rust buildup that might occur while at the same time preserving the quality taste of your food. You’ll want to scrape your grates after each use using a nylon-bristled cleaning brush, but you should also expect to do a deep cleaning at least once a year.
For a quick clean:
- Let grates cool completely after a cook. Using a nylon-bristled cleaning brush, scrape in a vertical pattern up and down the grates.
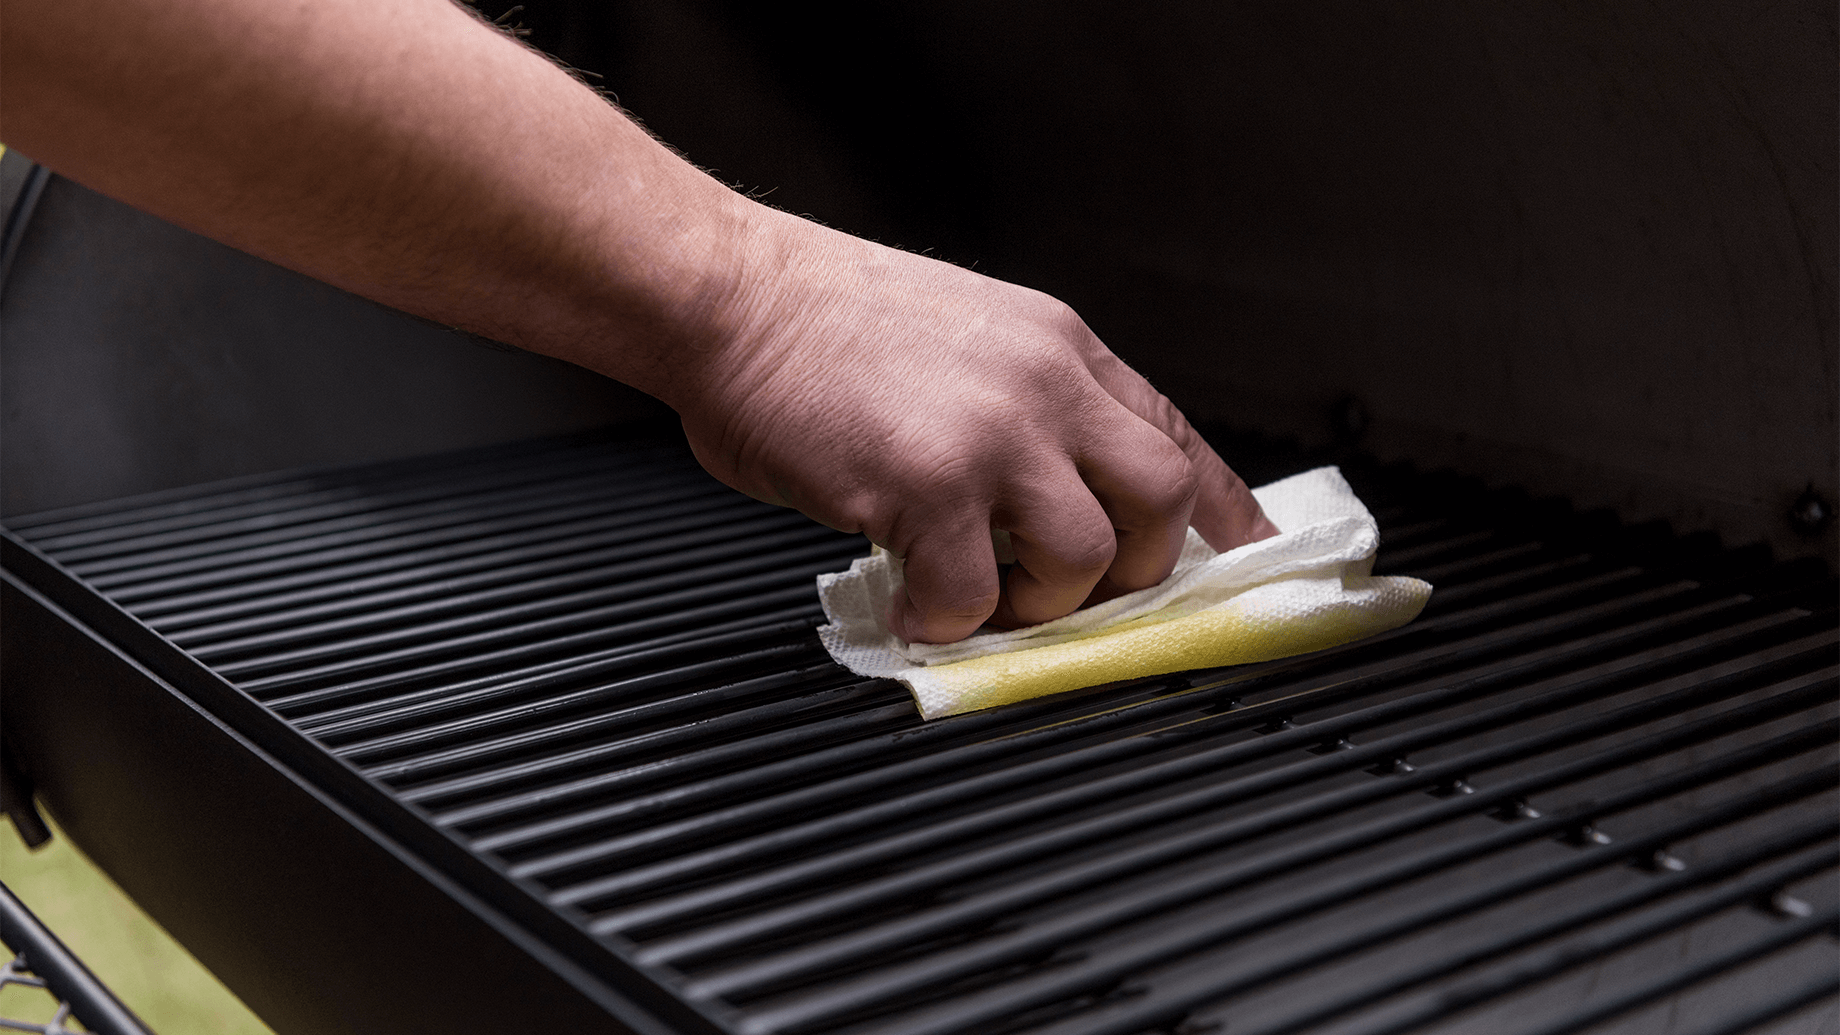
- After scraping your grates clean, dry and saturate the grates using vegetable oil to prevent rust from forming. DO NOT USE WATER.
For a deep clean:
- Mix 2 cups of vinegar and 1 cup of baking soda in a garbage bag.
- Seal the grates in the garbage bag with a rubber band or tie.
- Soak the grates overnight.
- Remove the grates and rinse them off with water. The food that was originally stuck on the grates should fall off, but if there’s anything still stuck on you should be able to easily scrub off the rest.
- Pat dry with a towel and saturate the grates with vegetable oil to prevent rust from forming.
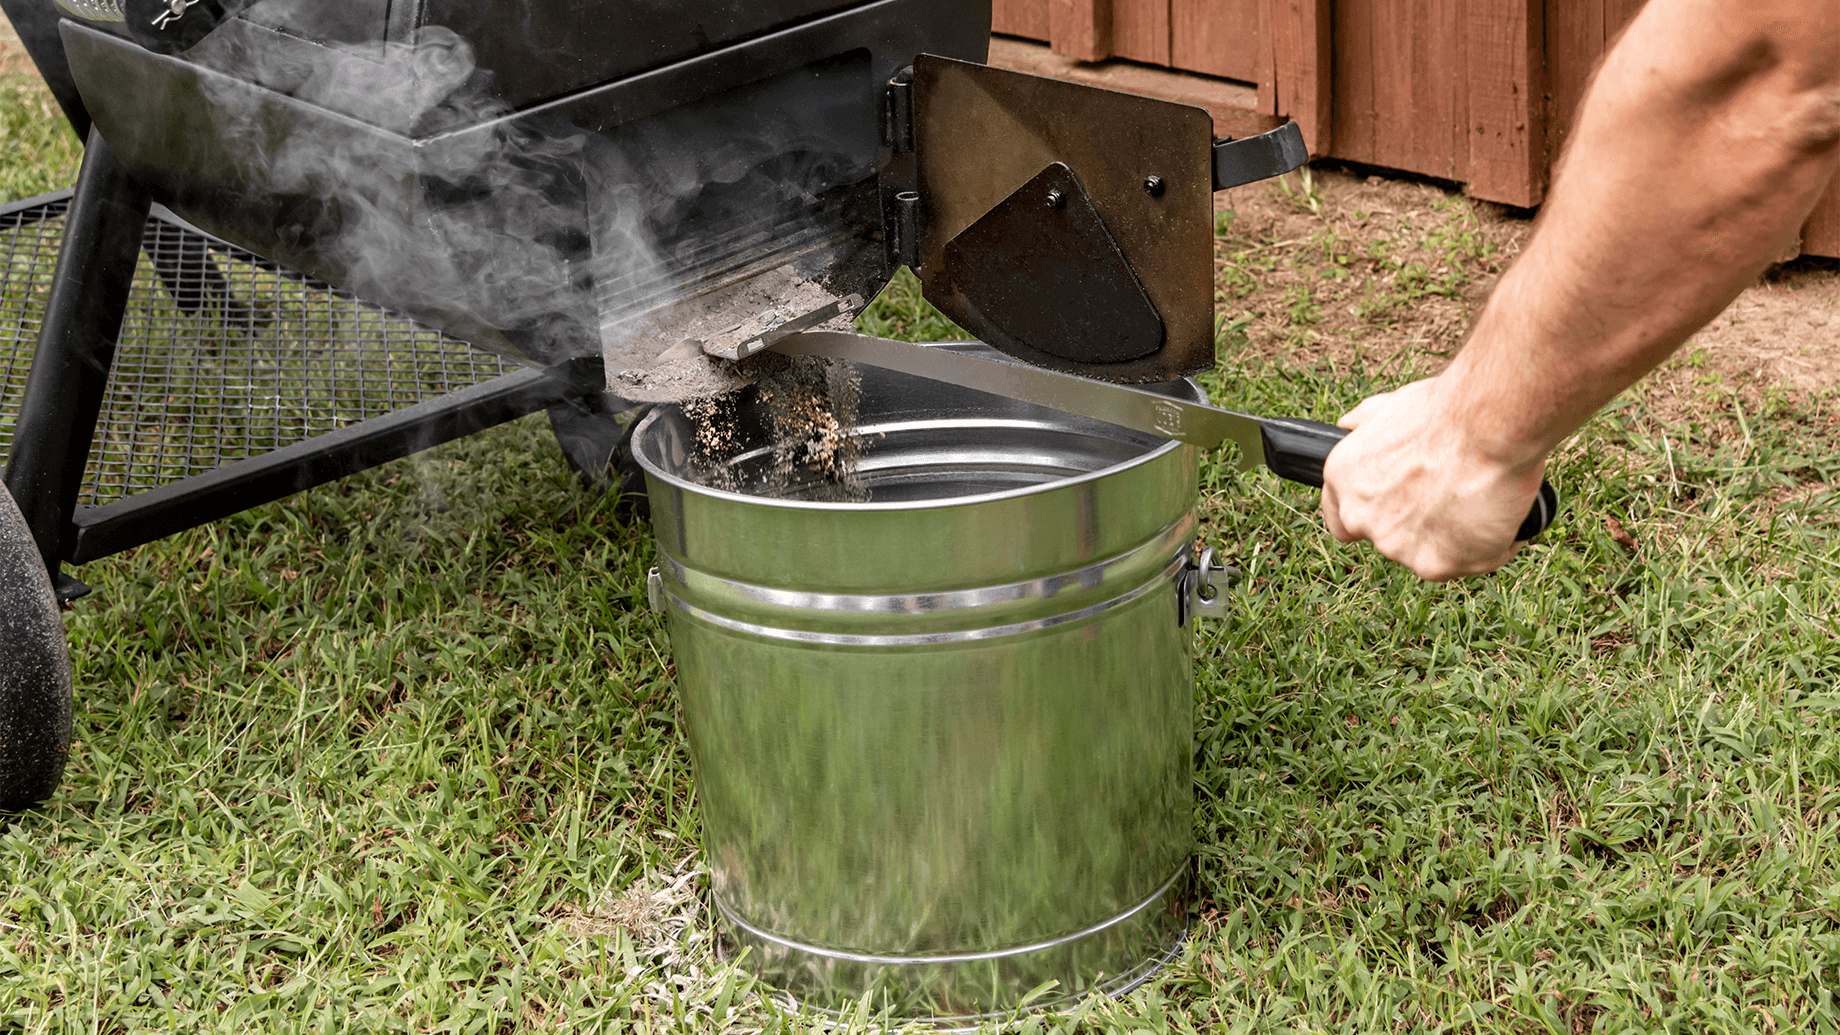
The frequency of clean-up in and around your smoker is determined by how often the smoker is used. Make sure coals are completely extinguished before cleaning the inside of the unit. Thoroughly rinse with water and allow to air dry before using again. Wipe out the interior of the unit with a cloth or paper towels. When finished cooking, and the unit has adequately cooled, clean out all remaining ashes. Ashes collect moisture, which can lead to premature rusting and decay. Use the Oklahoma Joe's® Blacksmith Rake & Brush to cleanout any coals and ash from the firebox after everything has cooled into a non-combustable garbage bin and dispose of according to your local trash service's guidelines.
Rust can appear on the inside of your smoker. Periodically coating the interior surfaces with vegetable oil will aid in the protection of your unit. Also, occasional touch up of the exterior paint will be required. We recommend the use of a commercially available black high temperature spray paint. NEVER PAINT THE INTERIOR OF THE UNIT.
To build your fire:
1. Stack charcoal briquettes or wood into a pyramid-shaped pile on top of the charcoal grate or ash pan. We recommend using 2 pounds (approximately 30 briquettes) to start your fire, adding more as needed.
2. If using lighter fluid, saturate the charcoal briquettes with lighter fluid and let it soak in for approximately 5 minutes. If using a chimney starter, electric starter, or other type of fire starter, light your fire according to the manufacturer's instructions.
3. Always light the fire with the cooking chamber and firebox lids open. Leave lid open until briquettes are fully lit. Failure to do this could trap fumes from charcoal lighter fluid in grill and may result in a flash fire when lid is opened.
4. Never add charcoal lighter fluid to hot or warm coals, as flashbacks may occur causing injury.
5. You are ready to begin cooking when the pile of briquettes ashes over and produces a red glow (approximately 12 – 15 minutes).
6. Depending on your cooking method, either leave the briquettes in a pile or spread evenly across the charcoal grate using a long-handled poker.
7. Avoid laying coals on smoker walls.
No. The Rider 600, 900 and DLX Pellet Grills are designed to be fueled by Oklahoma Joe’s wood pellets.
Oklahoma Joe’s wood pellets are 100% all-natural hardwood. We do not use any flavor oils or any other chemicals or binders.
Oklahoma Joe’s wood pellets are 100% all-natural hardwood. We do not use any flavor oils or any other chemicals or binders.
Since Oklahoma Joe’s wood pellets were designed to work with the Rider Pellet Grills, you’ll get the best performance out of Oklahoma Joe’s wood pellets. However, any all-natural, food-safe wood pellets will work in the Rider Pellet Grills.
Yes. You can mix wood pellet flavors to make your own unique flavor blends. Oklahoma Joe’s offers Apple, Hickory and Competition Blend wood pellets.
Always store wood pellets in your pellet storage bucket and keep them in a dry place. Never use damp or wet pellets, as they may damage your grill.
On low and slow settings, you’ll get about 6-8 hours of smoking time per 20-lbs. of pellets. On grilling settings, you’ll get about 2-5 hours of grilling time per 20-lbs. of pellets.
The smoke/sear lever on the Rider DLX Pellet Grill slides to the left for searing and to the right for smoking.
When using Smoke Mode, set the temperature between Low and 300°F in the white zone.
When using Sear Mode, set the temperature between Low and High in the orange zone. Allow 5 to 7 minutes for the circular center grate to reach searing temperature range.
No. Wood pellets designed for heating are not food-safe and should never be used in your Rider Pellet Grill.
The QuickDraw Hopper makes draining unused pellets from the hopper a simple task. First, slide the pellet storage bucket into the rails underneath the hopper. Next, pull and hold the handle to drain. You can re-fill the empty hopper with any pellet flavor you choose. Extra pellet storage buckets can be purchased so you can store all your favorite flavors.
Removing excess pellets from the hopper when the grill is not in use will help them stay dry and prevents them from breaking down in the grill, which could cause a jam.
The QuickDraw Hopper holds up to 20-lbs. of your favorite flavor of wood pellets, providing fuel for hours of cooking.
We recommend filling the hopper at the beginning of every cook and emptying it completely when finished cooking.
No, but it will keep your pellets safe during use. As always, empty the QuickDraw Hopper between cooks to keep your pellets dry and in good condition.
Approximately 45 minutes to 1 hour. This is a two-person job, so be sure to have some assistance.
Yes, we make a custom cover to fit each Rider Pellet Grill. View the Rider 600 cover and view the Rider 900 & Rider DLX cover.
Yes. Seasoning your grill before cooking will burn off any manufacturing residues, protect your grill surfaces and create the beginning of a cooked-in surface treatment that will add to the flavor of your cooks. Follow the detailed instructions for seasoning your grill in its included grilling guide.
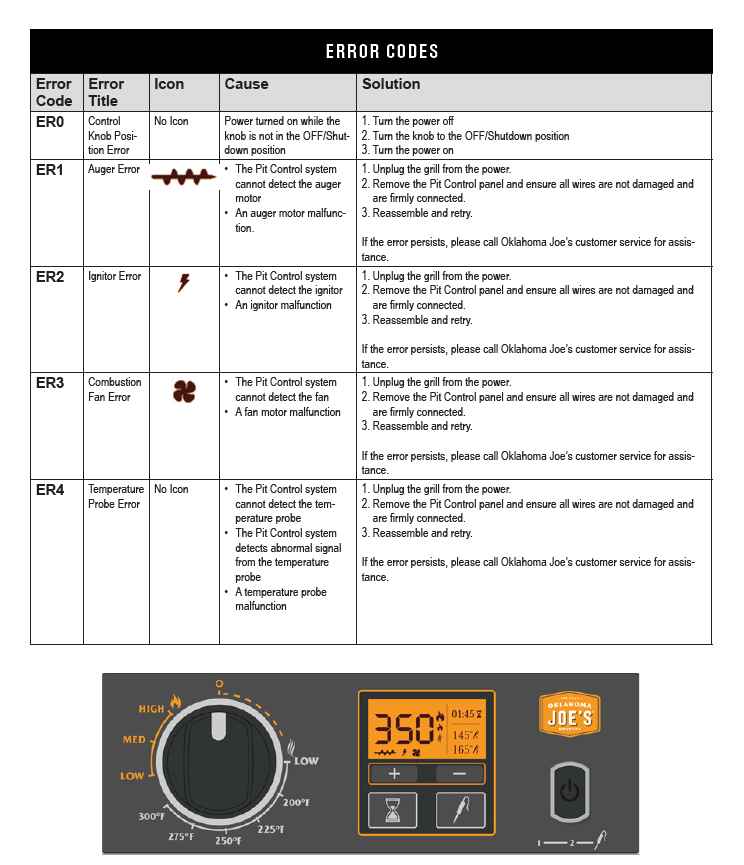
The Pit Control System is the brain of your Rider Pellet Grill. It uses proprietary algorithms to control and maintain your set cooking temperatures while avoiding temperature swings. Once you set your desired cooking temperature, the Pit Control System takes care of the rest. It is also equipped with two guidance features:
- Timer Mode: indicates when a set cook time has elapsed
- Temp Probe Mode: indicates when the internal temp of your food has reached a set target
The small temp sensor cable has an easily identifiable black connector. The other four have white connectors and wires that connect color to color; black & white to black & white, red to red and yellow to yellow. The only exception is purple & white, which connects to black.

Here’s a simple guide on how to use a dry rub:
- Choose your dry rub – For Ribs, we recommend our Kansas City rub or Memphis Rub. For Chicken, you’ll love the Nashville-style rub (warning, it has a little kick). If you’re looking for something more mild, the Carolina rub or Memphis rub would be great on poultry as well. For Brisket, you’ll want to go with our Texas Rub. Pulled Pork would also be amazing with Carolina, Memphis, or Kansas City.
- Prepare your meat - Before applying your BBQ rub, make sure the meat is dry. Pat it with paper towels to remove any excess moisture and help the dry rub adhere better to the meat.
- Apply the dry rub - Cover the entire surface of the meat with the BBQ rub and gently massage it into the meat so it is evenly coated on all sides.
- Let it rest - This allows flavors to penetrate the meat. We recommend letting it rest for at least 30 minutes. The longer you let your BBQ rub rest, the more intense the flavor.
- Apply the dry rub - Cover the entire surface of the meat with the BBQ rub and gently massage it into the meat so it is evenly coated on all sides.
Cook - Grilling, cooking, baking… cook your meat as you prefer and create the most amazing dishes!
All of our rubs are formulated for a 730-day (2-year) shelf life. While spices technically do not expire, they lose their intensity over time and the older they get the more seasoning will be needed.
We have 5 different rubs that pair perfectly with your favorite recipes and meats:
- Kansas City Rub: Our Kansas City rub is a flavorful blend of spices and seasonings used to coat meats before cooking, especially in barbecue. It typically includes ingredients like brown sugar/molasses, mustard powder, paprika, garlic powder, onion powder, salt, and pepper. Characteristics include warm, earthy, savory, peppery, and slightly sweet.
- Nashville City Rub: The Nashville rub is a flavorful seasoning blend with a burst of upfront heat that gives way to a hint of sweetness and pungency. It often includes ingredients like brown sugar/molasses, paprika, chili powder, cayenne pepper, garlic powder, buttermilk, and various spices. Characteristics include spicy, salty, and slightly sweet.
- Carolina Rub: A crowd favorite, our Carolina rub is a seasoning blend originating from the Carolina region in the United States. It often features a combination of Worcestershire sauce (powder), paprika, brown sugar/molasses, salt, black pepper, red pepper, garlic powder, mustard powder, turmeric, and celery seed providing a balanced and slightly tangy flavor profile. Characteristics include smokey, spicy, and sweet with a hint of acidity.
- Memphis Rub: Perfect for ribs, the Memphis rub is a dry seasoning blend used to flavor meats, especially in the Memphis barbecue tradition. It often includes ingredients like paprika, brown sugar/molasses, garlic powder, onion powder, black pepper, and various spices such as mustard, celery seed and cumin. Characteristics include slightly sweet with a great savory and earthy profile.
- Texas Rub: The Texas rub is a seasoning blend that reflects the barbecue traditions of Texas. It typically features a combination of salt, black pepper, red pepper, garlic powder, and other spices. The emphasis is on simple, bold flavors, especially in Central Texas barbecue. Characteristics include smoky, spicy, sweet, and salty.
While our rubs are versatile, here are some of our favorite pairings:
- Nashville: Tastes delicious with chicken.
- Carolina: Best on pulled pork, chicken and ribs.
- Memphis: We recommend it on ribs, pulled pork and chicken.
- Texas: Some of our favorite meats to pair with are brisket, tri-tip, ribeye and burgers.
- Kansas City: Pairs perfectly with baby back ribs, pork butts, and chicken.
While these are our favorite pairings, our rubs are versatile and work well with various meats, including beef, pork, chicken, and even game meats.
Absolutely! Our rubs can add a delicious flavor to grilled or roasted vegetables, tofu, and plant-based protein alternatives.
- For Kansas City, Nashville, Carolina, and Memphis rubs, using a binder, such as mustard or olive oil, can help the rub adhere better to the meat. However, it's not strictly necessary.
- For a Texas rub, using a binder is optional. Some pitmasters prefer applying the rub directly to the meat, allowing the spices to adhere naturally during the cooking process.
- Kansas City rubs are excellent for smoking, grilling, or slow-cooking methods. The sugars in the rub can caramelize, creating a delicious crust on the meat.
- Nashville rubs are well-suited for grilling, smoking, and roasting. The spice blend complements the smokiness from grilling and enhances the flavors during slow cooking.
- Carolina rubs are versatile and can be used for grilling, smoking, roasting, or slow cooking. They pair well with the slow and low cooking methods often used in Carolina barbecue.
- Memphis rubs are suitable for grilling, smoking, and roasting. They are particularly popular for slow-cooked meats like ribs, providing a delicious bark on the exterior.
- Texas rubs are well-suited for smoking, grilling, and slow-cooking methods. They shine particularly well on large cuts of meat like brisket and beef ribs.
While the rubs provide a good base of flavor, you can add more seasoning during cooking if desired. Basting with a barbecue sauce in the last stages of cooking is a common practice.
- Traditional Texas rubs are not very spicy. They focus on enhancing the natural flavors of the meat with a balance of salt and pepper. Adjustments can be made based on personal preferences.
- Memphis rubs are generally not overly spicy, but they can have a mild heat from ingredients like black pepper and cayenne.
- Carolina rubs are generally not extremely spicy. They are more known for their balance of sweetness, savory notes, and a slight tang.
- Our Nashville rub has a nice lingering heat that won’t blast your taste buds but want you to keep coming back for more. Everyone has different heat tolerance, but we feel this rub work for anyone who enjoys remotely spicy food.